Strategy View
The Strategy tab allows you to Identify the approach you are taking with your Project. In this article, we will cover how to access the tab, and the best way to utilize this important feature.
First, navigate to the Projects page, find the project you are working on, and click on the name of the project:

Once you are inside the project you are working on, click on the Strategy tab:

- Company Target Lists can be created for one project and reused for other projects
- Company Target Lists start with companies that already exist in your database
- Company Tag lists can be used to quickly create category lists
- Contacts can then be searched from within this pre-specified list of companies and be easily added to a project
Project Strategy
This tab offers you a way to build a list of target companies that your team and clients can collaborate on to define your search parameters. It typically outlines the who, what, where and how of your project. This is a wonderful way to document your approach to securing positions and candidates for your client.
If no Strategy is set, the User can add a Project Strategy. Clicking on the “Project Strategy” card and it will provide a text field and a section to add documents. Once you have all of your details inside, be sure to click outside of the card to save.

Project Profile
The Strategy tab also holds the Project Profile and Location Cards.
The Project Profile Includes features like; Industry, Specialty, Seniority, etc.. Click on the desired card to make changes to any of these details and click outside the card to save your changes.


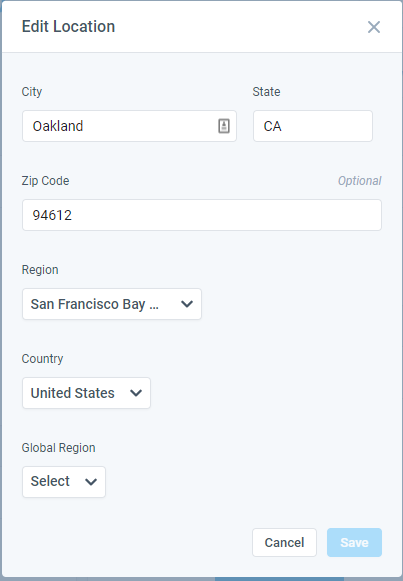
Location Card
The Location card can be edited the same way to change the: City, State, Postal Code, Country, Region, and Global Region.

Target List
Users can add a list to the Project Strategy. The list will hold your created Tags and Companies identifiers for the project.
When Users enter Tags in the “Add by Tags” field, all companies associated with the tag are added to the Companies Added field.
When User enters Companies in the “Add by Company” field, the companies are added to the Companies Added field.

New Companies added, by Tag or by Company, are displayed in blue, where as old Companies are turned to Grey. There will be a numerical notice to show the total count for Companies added next to the field label.
Companies can be removed any time by clicking the “x” in the corner of the company in the text field for the Companies Added Field.

If the company does not currently exist in your Companies database, you can import a CSV of the companies into the Target List. Click "How import works" to receive instructions on what to expect after importing your company records.
Pro Tip: Click Download a sample CSV file hyperlink to download our Template CSV with the proper Headers. Copy your companies and paste them into the template and upload the file for the most efficient import results.


After adding your file to the Target List, there will be a notification displaying that your Headers were processed. We encourage hovering your mouse over that notice to check for any Header mapping suggestions.

If a user creates a new Tag from the List, the new tags are added to all companies in the companies added field. Once complete you will see a success message shown.
Create Target List with Tags
Another way to create or reuse a Target List is by leveraging the Tags that are associated to the companies in your database. Using a Tag that is attached to all of the desired companies and clicking "Apply" will automatically fill in all of the companies in the "Add by Company" section.
To manage and keep your Target Lists clean when using Tags, use the Save and Add Tag feature when creating your list. To add new companies to the core Target List, retrieve all the companies from the first list using the original tag, add the new companies, name the Target List as a second version of the first and use the Save and Add Tag feature. Once this is completed you can navigate to the Tags table in the main navigation and merge the two tags (version 1 and version 2) into the a single version for future use.
To illustrate:
Jon has selected all of the companies that fit "SaaS, Bay Area, 50-100m" in his "Add Target List" modal. He uses the Save and Add Tag option. The new target list is created and his list of companies is now associated with the "SaaS, Bay Area, 50-100m" tag. This works well for his current project and he can leverage his Target List in working with his Client on his current Search.
Later in the year, Jon kicks off another project with a similar Client. He wants to reuse his Target List from the project above. He uses the "Add Target List" modal and selects his previously created tag "SaaS, Bay Area, 50-100m." He also realizes that he missed a couple of Companies that really should be included. He adds those companies in the "Add by Company" field. So that he can leverage his newly updated list, he adds a "1" to the name of the Target List so that it reads "SaaS, Bay Area, 50-100m 1" and uses the Save and Add Tag feature.
He can now go in and merge his "SaaS, Bay Area, 50-100m" with the "SaaS, Bay Area, 50-100m 1" tags to have a single master list of companies tagged with just "SaaS, Bay Area, 50-100m."


Search All List
Selecting Search All Lists opens People page with Companies from your created list in the Active companies filter.

The Target list is displayed at the bottom of the page. You can see the Name of the Target List, % coverage, and Edit in the header. The list displays the count of Candidates with Positions at the focused company in the past and in the present who are also currently on the project (regardless of statuses).
Firm Users can mark a Company as covered. In doing so it increases the coverage % by the value of 1/total companies in the target list.

*Please Note: The Current and Past columns are shown as the actual number of persons associated with those companies who are on your candidates list of your project.
When a company also belongs to another target list Active in the Project it will have colored dots next to its name.

Section Visibility
Clicking on the Gear symbol above Project Profile will display the “Section Visibility”. Giving the User the ability to make certain sections visible or not for the client view.

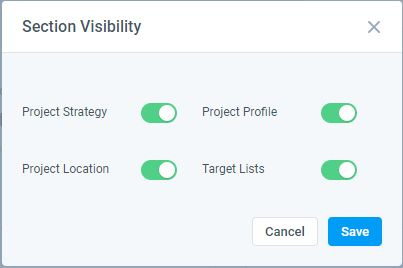
The Target List visibility toggle will be above each Target List, so you can show your desired Target List instead of hiding/showing all at once.

*Clients have view only access to all sections in their view. No editing or modifying allowed.
Notes:
Here are some other things to keep in mind when using the Strategy tab in Clockwork:
CLOCKWORK INITIAL TRAINING:
Previous Article: Position Tab Overview
Next Article: Create Target Company Lists
RELATED ARTICLES:
Why can't I see all of my projects in the Projects tab?