Status Reports: Settings
The Status Report is where you conduct your Status Calls with your clients.
Prior to the call, you are able to not only change the visibility of the Candidate data displayed in each Status Section, you are also able to change the note type that is displayed in each section. This way you can focus on the most relevant activity based on the stage of the project and the part of the process the focused candidate is in.
The Status Report is defaulted to visible for Clients and only includes Candidates marked visible. To change these settings, use the gear icon and update the Status Report visibility toggle or the Candidates included setting.

The Status Report Settings can be copied from any other project with a similar setup that you desire. Click the drop-down and type in the project title or scroll down the list of projects.

Page Settings
The Page Settings drop down helps users change the visibility of the client view. Users can decide which candidates to include (only visible or all) and which statuses to include in the view.

The Status Report defaults to display only the statuses that have visible candidates in them. For example, there may be 22 statuses available in the project, but only 5 of them have candidates assigned to them. Of those 5 status only 3 statuses have candidates marked as visible. If this were the case, then the default view would only have 3 status sections on the page since the page defaults to only statuses with visible candidates in them. You can override the default Page Settings by using this Section in the Settings modal.

Organized by Status, Color Category, or Ratings. Candidates are displayed based on the chosen display option.

Color Category
The Color Category display sorts by the color assigned in Grid View. In the display, Users have the ability to add a name to the color. This allow everyone to use the name as an index, so the entire team knows why a color is assigned to a candidate.


Ratings
The rating is attached to the Research Criteria found in the Position View. User can select or deselect which Rating using each checkbox or "Select All".

Section Settings
In the Section Settings drop down, each status section is modifiable. You can select which profile data and note type to display within each section. The Most Recent Note type is the default for each candidate but other types can be selected from the drop down (Select Note).

Users can apply the same settings to all sections with Select All for Users AND Toggle all On for Clients. Data posted in each section can change including the note that is in each section. The Note displayed in the section defaults to the most recent note of that type that IS VISIBLE.
IF no note of that type is visible, then the most recent note is displayed to the Firm User only with the option to make the note visible to Clients.
 If a selected note type is present on a candidate but that note is not visible to the Client, the application will give the Firm Users a warning and allow them to change the settings from that page. Clients do not see notes not marked as visible, and they do not see warnings for notes not made visible.
Note Author and Date are selected options for your desired Notes. The select options are for client visibility when they view the note displayed, regarding the candidate.
 The Page View Settings detail various Visibility Settings. Once your view is setup then click "Save" at the bottom of the pop-up.
Green Toggles = Client visibilities

Once you decide all of your Section Settings, you can sort the order of candidates by: Rank, name, Position Company, Color, Date Added, Date Presented, Date Last Updated (if made visible).

To commit any changes you have made in the Settings modal, be sure to press save.
The Download drop down allows you to Download the page as a PDF. If you want your most recent updates to be in the PDF download, you will have to save and then download in order for the page updates to complete.

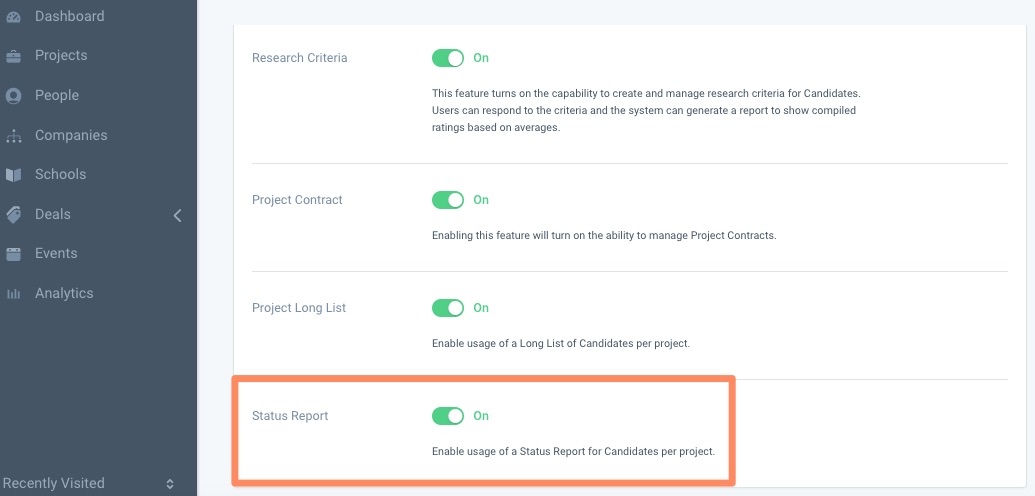
Disable Status Report
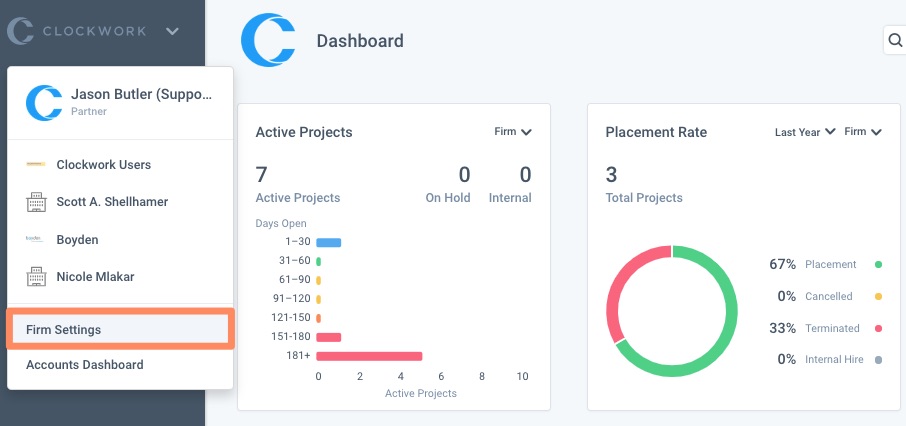
To disable Status Reports within your Firm, please make your way over to Firm Settings.
Click the Settings tab and open the Features section, then scroll down to Status Report.

Toggle the Status Report button to OFF.